

In part 1 of this series, I showed how to create a server-side Blazor application with authentication enabled.
In this post, I’m going to show how to setup authentication with client-side Blazor using WebAPI and ASP.NET Core Identity.
All the code for this post is available on GitHub.
If you are not familiar with ASP.NET Core Identity then you can checkout the Microsoft Docs site for full and in-depth information.
Getting Setup: Creating the solution
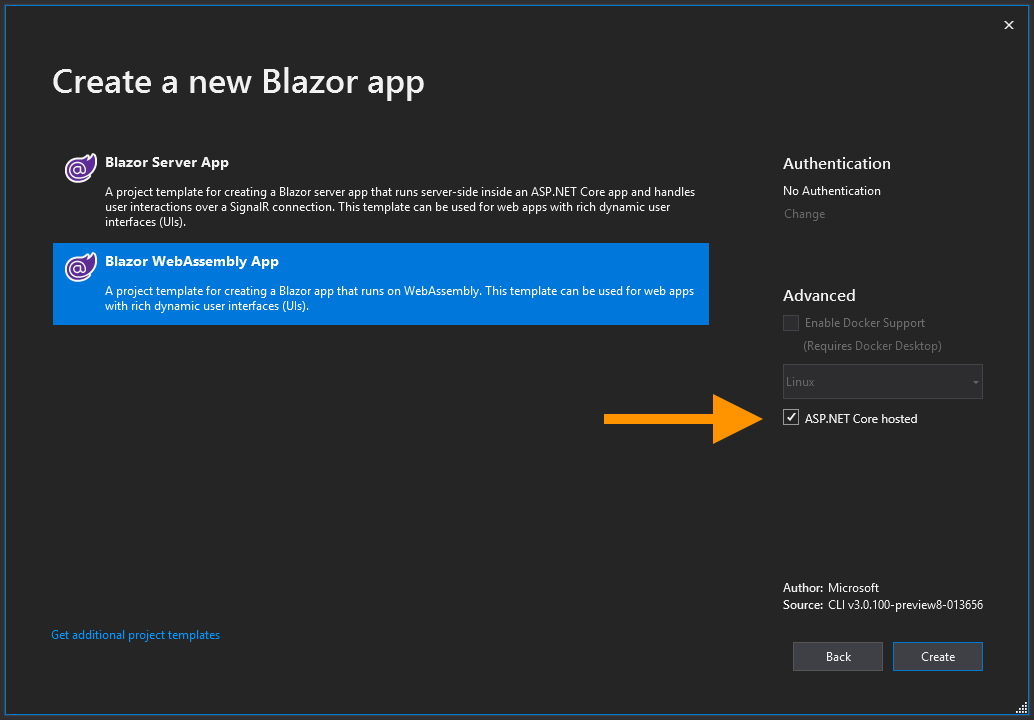
Start by creating a new Blazor WebAssembly App (remember to tick the ASP.NET Core hosted checkbox), this template will create a Blazor application which runs in the clients browser on WebAssembly hosted by a ASP.NET Core WebAPI. Once the solution has been created we’re going to start making some changes to the server project.
Configuring WebAPI
We’re going to configure the API first, but before we begin let’s get some NuGet packages installed.
    <PackageReference Include="Microsoft.AspNetCore.Blazor.Server" Version="3.1.0-preview3.19555.2" />
    <PackageReference Include="Microsoft.AspNetCore.Mvc.NewtonsoftJson" Version="3.1.0-preview3.19555.2" />

    <PackageReference Include="Microsoft.AspNetCore.Authentication.JwtBearer" Version="3.1.0-preview3.19555.2" />
    <PackageReference Include="Microsoft.AspNetCore.Identity.UI" Version="3.1.0-preview3.19555.2" />
    <PackageReference Include="Microsoft.AspNetCore.Diagnostics.EntityFrameworkCore" Version="3.1.0-preview3.19555.2" />
    <PackageReference Include="Microsoft.AspNetCore.Identity.EntityFrameworkCore" Version="3.1.0-preview3.19555.2" />
    <PackageReference Include="Microsoft.EntityFrameworkCore.SqlServer" Version="3.1.0-preview3.19554.8" />
    <PackageReference Include="Microsoft.EntityFrameworkCore.Tools" Version="3.1.0-preview3.19554.8">
      <PrivateAssets>all</PrivateAssets>
      <IncludeAssets>runtime; build; native; contentfiles; analyzers; buildtransitive</IncludeAssets>
    </PackageReference>
    <PackageReference Include="Microsoft.Extensions.Logging.Debug" Version="3.1.0-preview3.19553.2" />
    <PackageReference Include="Microsoft.VisualStudio.Web.CodeGeneration.Design" Version="3.1.0-preview3.19558.8" />
You can either add the above packages to your server projects .csproj file - or you can install them via the command line or NuGet package manager.
Setting up the Identity database: Connection string
Before we can set anything up, database wise we need a connection string. This is usually kept in the appsettings.json file, but the Blazor hosted template doesn’t supply one - so we are going to have to add it.
Right click on the server project and select Add > New Item. Then select App Settings File from the list.
{
  "ConnectionStrings": {
    "DefaultConnection": "Server=(localdb)\\MSSQLLocalDB;Database=AuthenticationWithClientSideBlazor;Trusted_Connection=True;MultipleActiveResultSets=true"
  }
}
The file comes with a connection string already in place, feel free to point this where ever you need to. I’m just going to add a database name and leave the rest as default.
Setting up the Identity database: DbContext
In the root of the server project create a folder called Data then add a new class called ApplicationDbContext with the following code.
public class ApplicationDbContext : IdentityDbContext
{
    public ApplicationDbContext(DbContextOptions options) : base(options)
    {
    }
}
Because we are using Identity which needs to store information in a database we’re not inheriting from DbContext but instead from IdentityDbContext. The IdentityDbContext base class contains all the configuration EF needs to manage the Identity database tables.
Setting up the Identity database: Registering services
In the Startup class we need to add a constructor which takes an IConfiguration and a property to store it. IConfiguration allows us to access the settings in the appsettings.json file, such as the connection string.
public IConfiguration Configuration { get; }

public Startup(IConfiguration configuration)
{
    Configuration = configuration;
}
Now we need to add the following lines to the top of the ConfigureServices method.
public void ConfigureServices(IServiceCollection services)
{
    services.AddDbContext<ApplicationDbContext>(options =>
                    options.UseSqlServer(Configuration.GetConnectionString("DefaultConnection")));

    services.AddDefaultIdentity<IdentityUser>()
        .AddEntityFrameworkStores<ApplicationDbContext>();

    // other code removed for brevity

}
Essentially, these two lines are adding the ApplicationDbContext to the services collection. Then registering the various services for ASP.NET Core Identity and telling it to use Entity Framework as a backing store via the ApplicationDbContext.
Setting up the Identity database: Creating the database
We’re now in a position to create the initial migration for the database. In the package manager console run the following command.
Add-Migration CreateIdentitySchema -o Data/Migrations
Once the command has run you should see the migrations file in Data > Migrations. Run Update-Database in the console to apply the migration to your database.
If you have any issues with running the migration command, make sure that the server project is selected as the default project in the package manager console.
Enabling Authentication: Registering services
The next step is to enable authentication in the API. Again, in ConfigureServices add the following code after the code we added in the previous section.
public void ConfigureServices(IServiceCollection services)
{

    // other code removed for brevity

    services.AddAuthentication(JwtBearerDefaults.AuthenticationScheme)
        .AddJwtBearer(options =>
        {
            options.TokenValidationParameters = new TokenValidationParameters
            {
                ValidateIssuer = true,
                ValidateAudience = true,
                ValidateLifetime = true,
                ValidateIssuerSigningKey = true,
                ValidIssuer = Configuration["JwtIssuer"],
                ValidAudience = Configuration["JwtAudience"],
                IssuerSigningKey = new SymmetricSecurityKey(Encoding.UTF8.GetBytes(Configuration["JwtSecurityKey"]))
            };
        });

     // other code removed for brevity

}
The code above is adding and setting up some services required for authentication to the service container. Then adding a handler for JSON Web Tokens (JWT) and configuring how received JWTs should be validated. Feel free to tweak these settings to your requirements.
Enabling Authentication: App settings
There are a few settings which are being loaded from the appsettings.json file.
Configuration["JwtIssuer"]Configuration["JwtAudience"]Configuration["JwtSecurityKey"]
We haven’ actually added them to the appsettings file yet, so let do that now. While we’re there we’ll also add a setting to control how long the tokens last, which we’ll use in a bit.
"JwtSecurityKey": "RANDOM_KEY_MUST_NOT_BE_SHARED",
"JwtIssuer": "https://localhost",
"JwtAudience": "https://localhost",
"JwtExpiryInDays": 1,
It’s really important that the JwtSecurityKey is kept secret as this is what is used to sign the tokens produced by the API. If this is compromised then your app would no longer be secure.
As I’m running everything locally I have my Issuer and _Audienc_e set to localhost. But if you’re using this in a real app then you would set the Issuer to the domain the API is running on and the Audience to the domain the client app is running on.
Enabling Authentication: Adding middleware
Finally, in the Configure method we need to add the necessary middleware to the pipeline. This will enable the authentication and authorization features in our API. Add them just above the app.UseEndpoints middleware.
app.UseAuthentication();
app.UseAuthorization();
That should be everything we need to do the Startup class. Authentication is now enabled for the API.
You can test everything is working by adding an [Authorize] attribute to the WeatherForecasts action on the SampleDataController. Then startup the app and navigate to the Fetch Data page, no data should load and you should see a 401 error in the console.
Adding the account controller
In order for people to login to our app they need to be able to signup. We’re going to add an account controller which will be responsible for creating new accounts.
[Route("api/[controller]")]
[ApiController]
public class AccountsController : ControllerBase
{
    private static UserModel LoggedOutUser = new UserModel { IsAuthenticated = false };

    private readonly UserManager<IdentityUser> _userManager;

    public AccountsController(UserManager<IdentityUser> userManager)
    {
        _userManager = userManager;
    }

    [HttpPost]
    public async Task<IActionResult> Post([FromBody]RegisterModel model)
    {
        var newUser = new IdentityUser { UserName = model.Email, Email = model.Email };

        var result = await _userManager.CreateAsync(newUser, model.Password);

        if (!result.Succeeded)
        {
            var errors = result.Errors.Select(x => x.Description);

            return Ok(new RegisterResult { Successful = false, Errors = errors });

        }

        return Ok(new RegisterResult { Successful = true });
    }
}
The Post action uses the ASP.NET Core Identity UserManager to create a new user in the system from a RegisterModel.
We haven’t added the register model yet so we can do that now, put this in the shared project as this will be used by our Blazor app in a bit.
public class RegisterModel
{
    [Required]
    [EmailAddress]
    [Display(Name = "Email")]
    public string Email { get; set; }

    [Required]
    [StringLength(100, ErrorMessage = "The {0} must be at least {2} and at max {1} characters long.", MinimumLength = 6)]
    [DataType(DataType.Password)]
    [Display(Name = "Password")]
    public string Password { get; set; }

    [DataType(DataType.Password)]
    [Display(Name = "Confirm password")]
    [Compare("Password", ErrorMessage = "The password and confirmation password do not match.")]
    public string ConfirmPassword { get; set; }
}
If all goes well then a successful RegisterResult is returned, otherwise a failed RegisterResult is returned. Again, we need to create the RegisterResult and again it needs to go in the shared project.
public class RegisterResult
{
    public bool Successful { get; set; }
    public IEnumerable<string> Errors { get; set; }
}
Adding the login controller
Now we have a way for users to signup we now need a way for them to login.
[Route("api/[controller]")]
[ApiController]
public class LoginController : ControllerBase
{
    private readonly IConfiguration _configuration;
    private readonly SignInManager<IdentityUser> _signInManager;

    public LoginController(IConfiguration configuration,
                           SignInManager<IdentityUser> signInManager)
    {
        _configuration = configuration;
        _signInManager = signInManager;
    }

    [HttpPost]
    public async Task<IActionResult> Login([FromBody] LoginModel login)
    {
        var result = await _signInManager.PasswordSignInAsync(login.Email, login.Password, false, false);

        if (!result.Succeeded) return BadRequest(new LoginResult { Successful = false, Error = "Username and password are invalid." });

        var claims = new[]
        {
            new Claim(ClaimTypes.Name, login.Email)
        };

        var key = new SymmetricSecurityKey(Encoding.UTF8.GetBytes(_configuration["JwtSecurityKey"]));
        var creds = new SigningCredentials(key, SecurityAlgorithms.HmacSha256);
        var expiry = DateTime.Now.AddDays(Convert.ToInt32(_configuration["JwtExpiryInDays"]));

        var token = new JwtSecurityToken(
            _configuration["JwtIssuer"],
            _configuration["JwtAudience"],
            claims,
            expires: expiry,
            signingCredentials: creds
        );

        return Ok(new LoginResult { Successful = true, Token = new JwtSecurityTokenHandler().WriteToken(token) });
    }
}
The sole job of the login controller is to verify the username and password in the LoginModel using the ASP.NET Core Identity SignInManger. If they’re correct then a new JSON web token is generated and passed back to the client in a LoginResult.
Just like before we need to add the LoginModel and LoginResult to the shared project.
public class LoginModel
{
    [Required]
    public string Email { get; set; }

    [Required]
    public string Password { get; set; }

    public bool RememberMe { get; set; }
}
public class LoginResult
{
    public bool Successful { get; set; }
    public string Error { get; set; }
    public string Token { get; set; }
}
That’s everything we need on our API. We have now configured it to use authentication via JSON web tokens. As well as setup the controllers we need for our Blazor client-side app to register new users and to login.
Configuring client-side Blazor
Let’s turn our attention to Blazor. The first thing we’re going to do is install Blazored.LocalStorage, we will need this later to persist the auth token from the API when we login.
We also need to update the App component to use the AuthorizeRouteView component instead of the RouteView component.
<Router AppAssembly="@typeof(Program).Assembly">
    <Found Context="routeData">
        <AuthorizeRouteView RouteData="@routeData" DefaultLayout="@typeof(MainLayout)" />
    </Found>
    <NotFound>
        <CascadingAuthenticationState>
            <LayoutView Layout="@typeof(MainLayout)">
                <p>Sorry, there's nothing at this address.</p>
            </LayoutView>
        </CascadingAuthenticationState>
    </NotFound>
</Router>
This component provides a cascading parameter of type Task<AuthenticationState>. This is used by the AuthorizeView component to determine the current users authentication state.
But any component can request the parameter and use it to do procedural logic, for example.
@code {
    [CascadingParameter] private Task<AuthenticationState> authenticationStateTask { get; set; }

    private async Task LogUserAuthenticationState()
    {
        var authState = await authenticationStateTask;
        var user = authState.User;

        if (user.Identity.IsAuthenticated)
        {
            Console.WriteLine($"User {user.Identity.Name} is authenticated.");
        }
        else
        {
            Console.WriteLine("User is NOT authenticated.");
        }
    }
}
Creating a Custom AuthenticationStateProvider
As we are using client-side Blazor we need to provide our own implementation for the AuthenticationStateProvider class. Because there are so many options when it comes to client-side apps there is no way to design a default class that would work for everyone.
We need to override the GetAuthenticationStateAsync method. In this method we need to determine if the current user is authenticated or not. We’re also going to add a couple of helper methods which we will use to update the authentication state when the user logs in or out.
public class ApiAuthenticationStateProvider : AuthenticationStateProvider
{
    private readonly HttpClient _httpClient;
    private readonly ILocalStorageService _localStorage;

    public ApiAuthenticationStateProvider(HttpClient httpClient, ILocalStorageService localStorage)
    {
        _httpClient = httpClient;
        _localStorage = localStorage;
    }
    public override async Task<AuthenticationState> GetAuthenticationStateAsync()
    {
        var savedToken = await _localStorage.GetItemAsync<string>("authToken");

        if (string.IsNullOrWhiteSpace(savedToken))
        {
            return new AuthenticationState(new ClaimsPrincipal(new ClaimsIdentity()));
        }

        _httpClient.DefaultRequestHeaders.Authorization = new AuthenticationHeaderValue("bearer", savedToken);

        return new AuthenticationState(new ClaimsPrincipal(new ClaimsIdentity(ParseClaimsFromJwt(savedToken), "jwt")));
    }

    public void MarkUserAsAuthenticated(string email)
    {
        var authenticatedUser = new ClaimsPrincipal(new ClaimsIdentity(new[] { new Claim(ClaimTypes.Name, email) }, "apiauth"));
        var authState = Task.FromResult(new AuthenticationState(authenticatedUser));
        NotifyAuthenticationStateChanged(authState);
    }

    public void MarkUserAsLoggedOut()
    {
        var anonymousUser = new ClaimsPrincipal(new ClaimsIdentity());
        var authState = Task.FromResult(new AuthenticationState(anonymousUser));
        NotifyAuthenticationStateChanged(authState);
    }

    private IEnumerable<Claim> ParseClaimsFromJwt(string jwt)
    {
        var claims = new List<Claim>();
        var payload = jwt.Split('.')[1];
        var jsonBytes = ParseBase64WithoutPadding(payload);
        var keyValuePairs = JsonSerializer.Deserialize<Dictionary<string, object>>(jsonBytes);

        keyValuePairs.TryGetValue(ClaimTypes.Role, out object roles);

        if (roles != null)
        {
            if (roles.ToString().Trim().StartsWith("["))
            {
                var parsedRoles = JsonSerializer.Deserialize<string[]>(roles.ToString());

                foreach (var parsedRole in parsedRoles)
                {
                    claims.Add(new Claim(ClaimTypes.Role, parsedRole));
                }
            }
            else
            {
                claims.Add(new Claim(ClaimTypes.Role, roles.ToString()));
            }

            keyValuePairs.Remove(ClaimTypes.Role);
        }

        claims.AddRange(keyValuePairs.Select(kvp => new Claim(kvp.Key, kvp.Value.ToString())));

        return claims;
    }

    private byte[] ParseBase64WithoutPadding(string base64)
    {
        switch (base64.Length % 4)
        {
            case 2: base64 += "=="; break;
            case 3: base64 += "="; break;
        }
        return Convert.FromBase64String(base64);
    }
}
There is a lot of code here so let’s break it down step by step.
The GetAuthenticationStateAsync method is called by the CascadingAuthenticationState component to determine if the current user is authenticated or not.
In the code above, we check to see if there is an auth token in local storage. If there is no token in local storage, then we return a new AuthenticationState with a blank claims principal. This is the equivalent of saying the current user is not authenticated.
If there is a token, we retrieve it and set the default authorization header for the HttpClient. We then return a new AuthenticationState with a new claims principal containing the claims from the token. The claims are extracted from the token by the ParseClaimsFromJwt method. This method decodes the token and returns the claims contained within it.
Full disclosure - the ParseClaimsFromJwt method is borrowed from Steve Sandersons Mission Control demo app, which he showed at NDC Oslo 2019.
The MarkUserAsAuthenticated is a helper method that’s used to when a user logs in. Its sole purpose is to invoke the NotifyAuthenticationStateChanged method which fires an event called AuthenticationStateChanged. This cascades the new authentication state, via the CascadingAuthenticationState component.
As you may expect, MarkUserAsLoggedOut does almost exactly the same as the previous method but when a user logs out.
Auth Service
The auth service is going to be the what we use in our components to register users and log them in and out of the application. It’s going to be a nice abstraction for all of the stuff going on in the background.
public class AuthService : IAuthService
{
    private readonly HttpClient _httpClient;
    private readonly AuthenticationStateProvider _authenticationStateProvider;
    private readonly ILocalStorageService _localStorage;

    public AuthService(HttpClient httpClient,
                       AuthenticationStateProvider authenticationStateProvider,
                       ILocalStorageService localStorage)
    {
        _httpClient = httpClient;
        _authenticationStateProvider = authenticationStateProvider;
        _localStorage = localStorage;
    }

    public async Task<RegisterResult> Register(RegisterModel registerModel)
    {
        var result = await _httpClient.PostJsonAsync<RegisterResult>("api/accounts", registerModel);

        return result;
    }

    public async Task<LoginResult> Login(LoginModel loginModel)
    {
        var loginAsJson = JsonSerializer.Serialize(loginModel);
        var response = await _httpClient.PostAsync("api/Login", new StringContent(loginAsJson, Encoding.UTF8, "application/json"));
        var loginResult = JsonSerializer.Deserialize<LoginResult>(await response.Content.ReadAsStringAsync(), new JsonSerializerOptions { PropertyNameCaseInsensitive = true });

        if (!response.IsSuccessStatusCode)
        {
            return loginResult;
        }

        await _localStorage.SetItemAsync("authToken", loginResult.Token);
        ((ApiAuthenticationStateProvider)_authenticationStateProvider).MarkUserAsAuthenticated(loginModel.Email);
        _httpClient.DefaultRequestHeaders.Authorization = new AuthenticationHeaderValue("bearer", loginResult.Token);

        return loginResult;
    }

    public async Task Logout()
    {
        await _localStorage.RemoveItemAsync("authToken");
        ((ApiAuthenticationStateProvider)_authenticationStateProvider).MarkUserAsLoggedOut();
        _httpClient.DefaultRequestHeaders.Authorization = null;
    }
}
The Register method posts the registerModel to the accounts controller and then returns the RegisterResult to the caller.
The Login method is similar to the Register method, it posts the LoginModel to the login controller. But when a successful result is returned it strips out the auth token and persists it to local storage.
It then calls the MarkUserAsAuthenticated method we just looked at on the ApiAuthenticationStateProvider. Finally, it sets the default authorization header on the HttpClient.
The Logout method is just doing the reverse of the Login method.
Register Component
We’re on the home stretch now. We can now turn our attention to the UI and creating a component which will allow people to register with the site.
@page "/register"
@inject IAuthService AuthService
@inject NavigationManager NavigationManager

<h1>Register</h1>

@if (ShowErrors)
{
    <div class="alert alert-danger" role="alert">
        @foreach (var error in Errors)
        {
            <p>@error</p>
        }
    </div>
}

<div class="card">
    <div class="card-body">
        <h5 class="card-title">Please enter your details</h5>
        <EditForm Model="RegisterModel" OnValidSubmit="HandleRegistration">
            <DataAnnotationsValidator />
            <ValidationSummary />

            <div class="form-group">
                <label for="email">Email address</label>
                <InputText Id="email" class="form-control" @bind-Value="RegisterModel.Email" />
                <ValidationMessage For="@(() => RegisterModel.Email)" />
            </div>
            <div class="form-group">
                <label for="password">Password</label>
                <InputText Id="password" type="password" class="form-control" @bind-Value="RegisterModel.Password" />
                <ValidationMessage For="@(() => RegisterModel.Password)" />
            </div>
            <div class="form-group">
                <label for="password">Confirm Password</label>
                <InputText Id="password" type="password" class="form-control" @bind-Value="RegisterModel.ConfirmPassword" />
                <ValidationMessage For="@(() => RegisterModel.ConfirmPassword)" />
            </div>
            <button type="submit" class="btn btn-primary">Submit</button>
        </EditForm>
    </div>
</div>

@code {

    private RegisterModel RegisterModel = new RegisterModel();
    private bool ShowErrors;
    private IEnumerable<string> Errors;

    private async Task HandleRegistration()
    {
        ShowErrors = false;

        var result = await AuthService.Register(RegisterModel);

        if (result.Successful)
        {
            NavigationManager.NavigateTo("/login");
        }
        else
        {
            Errors = result.Errors;
            ShowErrors = true;
        }
    }

}
The register component contains a form which allows the user to enter their email address and desired password. When the form is submitted the Register method on the AuthService is called passing in the RegisterModel. If the result of the registration is a success then the user is navigated to the login page. Otherwise any errors are displayed to the user.
Login Component
Now we can register a new account, we need to be able to login. The login component is going to be responsible for that.
@page "/login"
@inject IAuthService AuthService
@inject NavigationManager NavigationManager

<h1>Login</h1>

@if (ShowErrors)
{
    <div class="alert alert-danger" role="alert">
        <p>@Error</p>
    </div>
}

<div class="card">
    <div class="card-body">
        <h5 class="card-title">Please enter your details</h5>
        <EditForm Model="loginModel" OnValidSubmit="HandleLogin">
            <DataAnnotationsValidator />
            <ValidationSummary />

            <div class="form-group">
                <label for="email">Email address</label>
                <InputText Id="email" Class="form-control" @bind-Value="loginModel.Email" />
                <ValidationMessage For="@(() => loginModel.Email)" />
            </div>
            <div class="form-group">
                <label for="password">Password</label>
                <InputText Id="password" type="password" Class="form-control" @bind-Value="loginModel.Password" />
                <ValidationMessage For="@(() => loginModel.Password)" />
            </div>
            <button type="submit" class="btn btn-primary">Submit</button>
        </EditForm>
    </div>
</div>

@code {

    private LoginModel loginModel = new LoginModel();
    private bool ShowErrors;
    private string Error = "";

    private async Task HandleLogin()
    {
        ShowErrors = false;

        var result = await AuthService.Login(loginModel);

        if (result.Successful)
        {
            NavigationManager.NavigateTo("/");
        }
        else
        {
            Error = result.Error;
            ShowErrors = true;
        }
    }

}
Following a similar design to the register component. There is a form for the user to input their email address and password.
When the form is submitted the AuthService is called and the result is returned. If the login was successful then the user is redirected to the home page, otherwise they are shown the error message.
Logout Component
We can now register and login but we also need the ability to logout. I’ve gone with a page component to do this but you could also implement this on a button click somewhere.
@page "/logout"
@inject IAuthService AuthService
@inject NavigationManager NavigationManager

@code {

    protected override async Task OnInitializedAsync()
    {
        await AuthService.Logout();
        NavigationManager.NavigateTo("/");
    }

}
The component doesn’t have any UI, when the user navigates to it the Logout method on the AuthService is called and then the user is redirected back to the home page.
Adding a LoginDisplay and updating the MainLayout
The final task is to add a LoginDisplay component and then update the MainLayout component to use it.
The LoginDisplay component is the same one used in the server-side Blazor template. If unauthenticated, it shows the R_egister_ and Log in links - if unauthenticated, it shows the users email and the Log out link.
<AuthorizeView>
    <Authorized>
        Hello, @context.User.Identity.Name!
        <a href="LogOut">Log out</a>
    </Authorized>
    <NotAuthorized>
        <a href="Register">Register</a>
        <a href="Login">Log in</a>
    </NotAuthorized>
</AuthorizeView>
We just need to update the MainLayout component now.
@inherits LayoutComponentBase

<div class="sidebar">
    <NavMenu />
</div>

<div class="main">
    <div class="top-row px-4">
        <LoginDisplay />
        <a href="http://blazor.net" target="_blank" class="ml-md-auto">About</a>
    </div>

    <div class="content px-4">
        @Body
    </div>
</div>
Registering Services
The last thing that’s needed is to register the various services we’ve been building in the Startup class.
public void ConfigureServices(IServiceCollection services)
{
    services.AddBlazoredLocalStorage();
    services.AddAuthorizationCore();
    services.AddScoped<AuthenticationStateProvider, ApiAuthenticationStateProvider>();
    services.AddScoped<IAuthService, AuthService>();
}
If everything has gone to plan then you should have something that looks like this.
Summary
In this post I showed how to create a new Blazor client-side application with authentication using WebAPI and ASP.NET Core Identity.
I showed how to configure the API to process and issue JSON web tokens. As well as how to setup the various controller actions to service the client application.I then showed how to configure Blazor to use the API and the tokens it issued to set the apps authentication state.
As I mentioned at the start of this post, all the code is available on GitHub.
