

This is the first, in what will probably be a series of blog posts, I’ve been looking forward to writing for a while – I’m going to be exploring the new experimental Mobile Blazor Bindings project.
In this post, I’m going to be giving an introduction to the Mobile Blazor Bindings (MBB) project, what it is, why you might be interesting in trying it, what is and isn’t available and we’ll finish with creating our first app.
What is Mobile Blazor Bindings?
It’s a new experimental project led by Eilon Lipton, a principal software engineer at Microsoft. The unique selling point of the project is it enables developers to author native, cross platform mobile apps using Blazors programming model.
What this means is instead of writing a mix of C# and HTML to create components, as we would in the web hosting models for Blazor, we write C# and native mobile controls. To give you an idea of what this looks like, below is a counter component written for a Blazor WebAssembly application, then below that is that same component but written for MBB.
<!-- Blazor WebAssembly -->

<p>Current count: @currentCount</p>
<button class="btn btn-primary" @onclick="IncrementCount">Click me</button>

@code {
    int currentCount = 0;

    void IncrementCount()
    {
        currentCount++;
    }
}
<!-- Mobile Blazor Bindings -->

<Label Text="@($"Current count: {currentCount}")" />
<Button Text="Click me" OnClick="@IncrementCount" />

@code
{
    int currentCount = 0;

    void IncrementCount()
    {
        currentCount++;
    }
}
As you can see the programming model is identical, it’s just the types of controls which are used that is different. This makes MBB a great stepping stone for web developers looking to get into cross platform native mobile app development, using their existing skills.
The components we use to author apps with MBB are essentially wrappers around Xamarin Forms controls. At the time of writing, the following components are available.
Page components
ContentPageMasterDetailPagePageTabbedPageTemplatedPage
Layout components
ContentViewFrameGridScrollViewStackLayout
View components
ActivityIndicatorBoxViewButtonCheckBoxImageImageButtonEntryLabelProgressBarSliderStepperSwitch
Specialized components
ApplicationBaseMenuItemFormattedStringGestureElementMenuItemShell(includingShellContent,ShellGroupItem,ShellItem,FlyoutItem,TabBar,ShellSection,Tab)Span
You can checkout the official docs to get the most up-to-date information on the current components available.
After reading the above, a few questions may be going round in your head, what about Xamarin? Do they know about this? Is Xamarin being replaced? These are all good questions so let’s cover those next.
What about Xamarin? Is it being replaced?
The first thing to point out is that MBB is just an experiment, there is no commitment to developing and delivering this as a product. When the first version of MBB was announced, the blog post contained the following statement.
We have heard from a set of developers that come from a web programming background that having web specific patterns to build mobile applications would be ideal for them. The goal of these bindings is to see if developers would like to have the option of writing markup and doing data binding for native mobile applications using the Blazor-style programming model with Razor syntax and features.
The key part to pull out is “if developers would like to have the option”. MBB, if was taken forward, would offer an alternative to writing native mobile apps using XAML.
I think this is a great idea and I’m keen to see where it goes, the big thing keeping me away from native mobile development is XAML, I just don’t like it. That’s not to say there is anything wrong with it, I know a lot of developers really enjoy working with it. I also know a lot of developers also feel the same way about HTML.
I think giving developers the choice to write apps using the languages they enjoy, and have skills in, is a fantastic thing. The likes of Uno Platform are offering the same choice the other way, allowing developers familiar with XAML the option to write web applications using that instead of HTML. Everyone wins!
Getting Setup
Now we’ve gotten a better understanding of what MBB is and why we might want to try it out. Let’s move on and get setup so we can start playing with it.
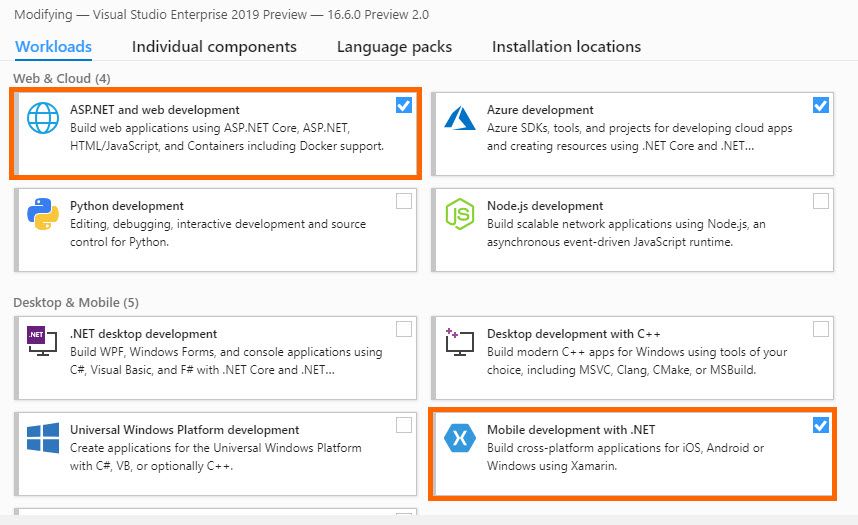
Installing Workloads
You can try out MBB using either Visual Studio or Visual Studio for Mac, but you will need to install the following workloads:
- Mobile development with .NET
- ASP.NET and web development
Once you have installed the above workloads, if you don’t already have it, you will also need to download and install the latest version of the .NET SDK.
Installing the MBB Template
There is a project template we need to use to create new MBB applications, this can be installed using the dotnet CLI using the following command (you may want to check for a newer version of the templates before installing).
dotnet new -i Microsoft.MobileBlazorBindings.Templates::0.2.42-preview
Once you have the template installed, you should be able to see it when running the dotnet new command.

Enabling Windows Hypervisor Platform

This was something I bumped into when I first tried to run the Android emulator from Visual Studio. I then had to go and enable it which then required a restart of my PC. So I want to save you a bit of time and let you know about it now.
Windows Hypervisor Platform will greatly improve the performance of the Android emulator when working with MBB, or any Xamarin application for that matter. If you follow this link, full instructions are given on how to enable WHP on your machine.
Creating an MBB app
Once you’ve completed the above steps you should be ready to create your first Mobile Blazor Bindings application!
Currently there is no integration with the new project dialogue in Visual Studio so we will need to create the app from the command line using the dotnet CLI. To create a new MBB app use the following command (I’ve called my app HelloMBB but call yours whatever you want):
dotnet new mobileblazorbindings -o HelloMBB
You can now open Visual Studio and load up the solution. You should see 3 projects in the Solution Explorer, HelloMBB, HelloMBB.Android and HelloMBB.iOS.
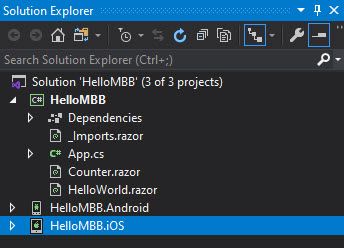
The Android and iOS projects are essentially shells for the particular platform which our MBB app is going to load into. All of the application logic is kept in the HelloMBB project.
This is the same approach you can use to run a Blazor web app using either the Server or WebAssembly hosting model. Putting all common components into a RazorClassLibrary and removing everything but the infrastructure code from the Server and WebAssembly projects. You can find an example of that approach on my GitHub if you’ve not seen it before.
If you want to run the iOS project you’re going to need a Mac in order to compile the project. This is due to Apples licencing and there isn’t a way around it. I do have a Mac but I’m current working on a Windows machine so, for now, I’m going to set the Android project as the startup project and then hit F5 to run the application.
Creating an Android Device
If you’ve not done any Xamarin work before, after a few seconds, you will see this screen.
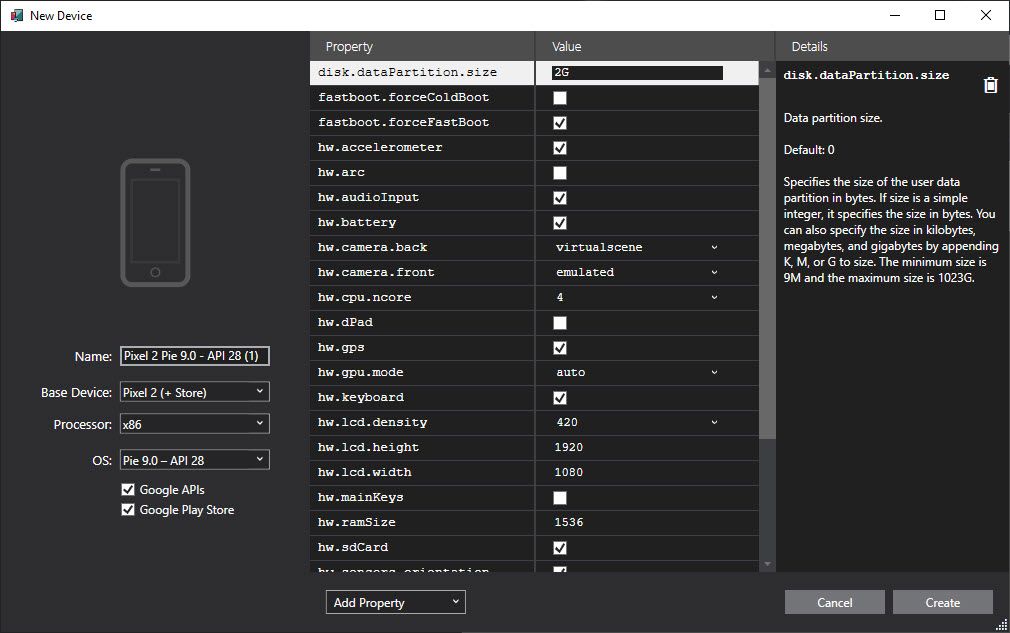
This is because we don’t currently have an Android device setup for the emulator to use. I’m not very familiar with Android devices so I’ve created the default device selected, Pixel 2 (+ Store). This seems to work really well, at least on my machine* 😋.
Once you create your device, it will be downloaded and then you will be able to use it. This can take a good few minutes to complete.
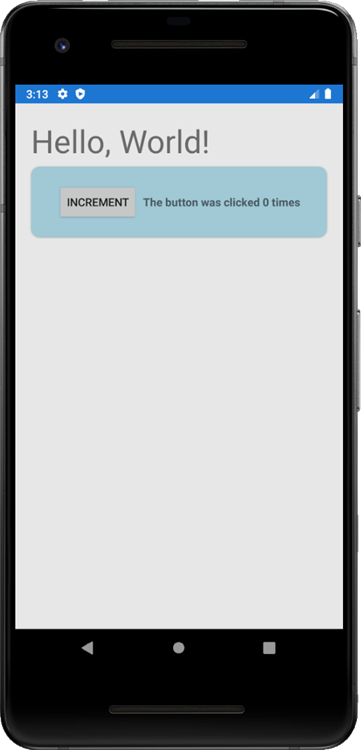
Running the App
You will probably ended up back at Visual Studio, at least I did, but now the Start Debugging button should contain the name of the new device you’ve created. Hit F5 again and after a few moments you should see your new MBB app.
Making Changes
Let’s make a simple change, well add in a button which updates the text to display “Hello, MBB!” instead of the default “Hello, World!”. Currently, there is no hot reload available for MBB so we are going to have to stop debugging to make our changes.
Once you’ve stopped debugging, open up the HelloWorld.razor file, it should look like this.
<ContentView>
    <StackLayout Margin="new Thickness(20)">

        <Label Text="Hello, World!"
               FontSize="40" />

        <Counter />

    </StackLayout>
</ContentView>
We’re going to update the code to match the code below.
<ContentView>
    <StackLayout Margin="new Thickness(20)">

        <Label Text="@WelcomeMessage"
               FontSize="40" />

        <Button Text="Update Message" OnClick="@(() => WelcomeMessage = "Hello, MBB!")" />

        <Counter />

    </StackLayout>
</ContentView>

@code {

    public string WelcomeMessage { get; set; } = "Hello, World!";

}
Instead of the Label text being hardcoded, it’s now using the WelcomeMessage property. When we click the Button we’re updating the value of WelcomeMessage to be “Hello, MBB!”.
Press F5 to run the updated app, when you click on Update Message you should see the new message displayed.
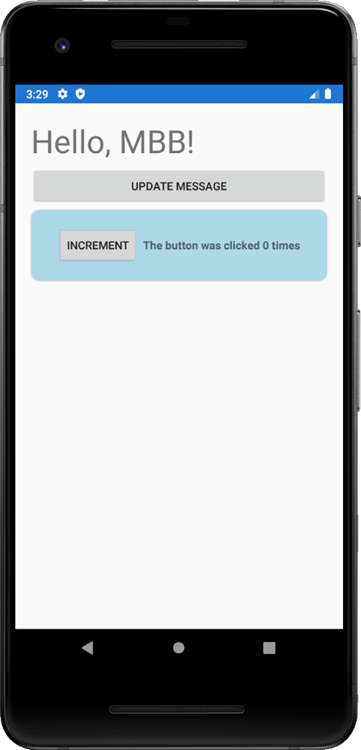
Congratulations, you’ve just created, modified and run your first Mobile Blazor Bindings application!
Summary
In this post I have introduced Mobile Blazor Bindings. We started off by covering what MBB is, why we might choose to try it out and what components are available. We also talked about MBB in relation to Xamarin and how it complements the existing Xamarin platform.
We then moved on to setting up a machine to use MBB, covering the workloads required by Visual Studio and Visual Studio for Mac. How to install the template for MBB and improve the performance of the Android device emulator by enabling Windows Hypervisor Platform.
Finally, we created a new MBB app and ran it on an Android device emulator. We then made a simple change to the app, adding in a button which updated the default message displayed.
I hope I’ve piqued you interest in Mobile Blazor Bindings. Next time I’m going to delve deeper by building out a more complex app.
