

I’ve been doing a lot of styling work recently so I thought it might be useful to write a post about it. We’re going to have a run through of what Sass is and why you might want to use it. And then we’re going to have a look at how we can get it integrated into a Blazor application.
What is Sass?
As you can probably tell from my very subtle title, I use Sass for managing my styles. If you’ve never heard of Sass, it stands for Syntactically Awesome Style Sheets and it’s a Css extension language or pre-processor.
Sass has two syntax options, SCSS and indented. The latter is the older, original syntax for Sass. Files using this option have a .sass extension. It uses indentation in order to describe the format of the document instead of the brackets and semi-colons found in traditional Css.
SCSS is the more modern syntax and files using this option have the .scss extension. Minus a few small exceptions, this is superset of Css and therefor any valid Css is also valid SCSS. This option uses brackets and semi-colons and looks almost identical to traditional Css which makes it easier to pick up for most people.
We can’t use Sass files directly, they must be compiled it into valid Css first. There are a few different way of doing this but traditionally the common approach is to install Npm, a task runner like Gulp along with various other packages to handle the compilation and eventual minification. Don’t worry though, in a bit I’m going to show you how you can avoid all of that and stay within the .NET ecosystem to compile your Sass.
Why use Sass?
Now we know a bit about Sass why would we want to use it? Css has always been a tricky to manage, especially in large applications or team environments. Stylesheets become very large and making changes or keeping things organised quickly becomes an issue. Not to mention the amount of repeated code that inevitably happens.
SASS offers a solution to this by enabling the use of basic programming paradigms such as modules, variables, functions and inheritance.
For example, how many times have you gone searching back through your Css for a certain colour value or padding size? Sass variable remove this issue, you can define your value in a variable which you can then use throughout your styles.
$primary-color: #f4f4f3;

a { color: $primary-color; }
.logo { color: $primary-color; }
Another common problem with Css is repeating the same code. SASS give us an answer to that as well in the form of mixins. Mixins allow us to write re-usable chunks of code which we can then apply anywhere across our site.
@mixin flex-row() {
  display: flex;
  flex-direction: row;
}

.row {
  @include flex-row;
}
The above example compiles to the following Css.
.row {
  display: flex;
  flex-direction: row;
}
We can even pass variables into them to make them even more flexible.
@mixin transform($degrees) {
  transform: translateZ($degrees);
  -webkit-transform: translateZ($degrees);
  -ms-transform: translateZ($degrees);
}

.header {
  @include transform(180deg);
}
Which compiles to this.
.header {
  transform: translateZ(180deg);
  -webkit-transform: translateZ(180deg);
  -ms-transform: translateZ(180deg);
}
You can see examples of all the great features of Sass in the guide on the official site. But hopefully, even with the examples above, you can see what an advantage using Sass can give you.
Using SASS with Blazor
Now we know some of the benefits of using SASS, let’s look at how can we take advantage of it in Blazor. We’re also looking to avoid the JavaScript tool chain for compiling the Sass as well, so what are our options?
The answer to this question is Web Compiler by Madz Kristensen. This extension for Visual Studio will allow us to compile Sass to Css without having to install NPM or Gulp. The even better news is that there is also a NuGet package which adds a MSBuild task so we can even compile Sass in our devops pipeline.
Installing Web Compiler
Start by opening up Visual Studio 2019 and going to the Extension > Manage Extensions menu. Select Online from the left menu and then search for web compiler in the search box.
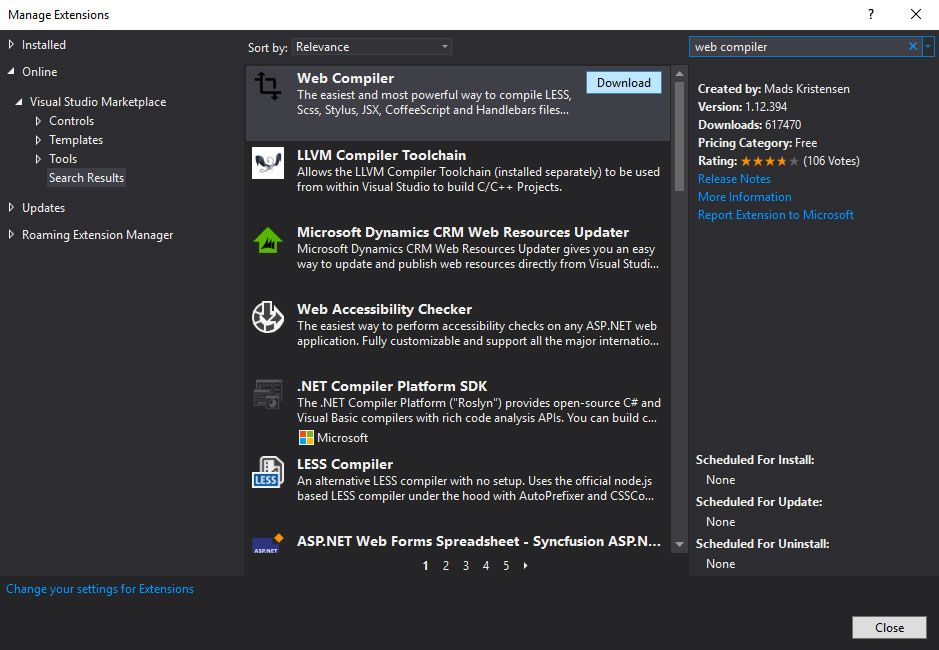
Click Download and then close Visual Studio to start the install process.
Once the install process is complete you can re-open Visual Studio. I’m going to create a fresh Blazor client-side app for this process but you can follow along using your own application.
Enabling Sass Compilation
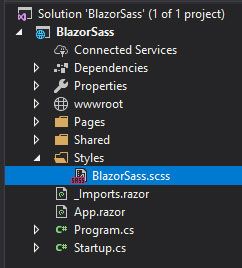
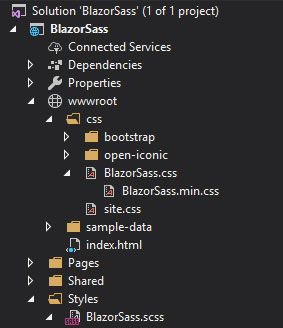
I’m going to start by adding a Sass file to my project. I"m going to add this in a new folder at the root of my app called Styles.
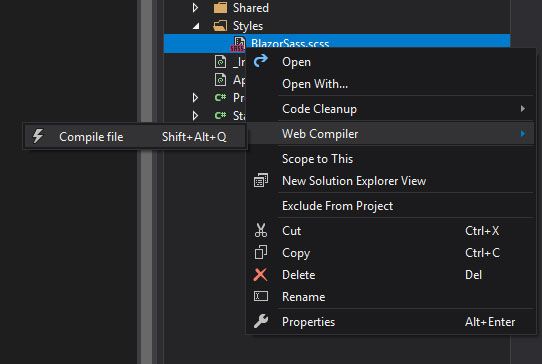
Next, I’m going to right click on that file and go to the Web Compiler menu and then Compile File.
Once that is done there should be some new files in the project.
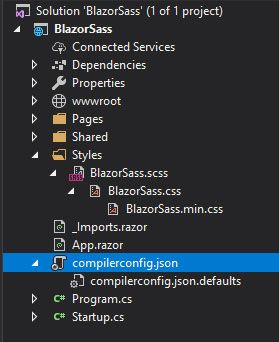
There is now a .css version of my Sass file, BlazorSass.css. And there is also a minified version, BlazorSass.min.css. In the root there are two new files, compilerconfig.json and compilerconfig.json.defaults. Let have a closer look at these two.
// compilerconfig.json

[
  {
    "outputFile": "Styles/BlazorSass.css",
    "inputFile": "Styles/BlazorSass.scss"
  }
]
The compilerconfig.json allows us to specify an input and an output file. We input SASS and it will output Css. By default, the output is located next to the input file but I’m going to make a change here and move the output location to the wwwroot folder. This will allow our compiled Css to be included when we publish our app.
// compilerconfig.json

[
  {
    "outputFile": "wwwroot/css/BlazorSass.css",
    "inputFile": "Styles/BlazorSass.scss"
  }
]
You will notice that as soon as you save the changes to the file your Sass will be recompiled and a new file will appear in the new output location.
The great thing about Web Compiler is that whenever a change is made to either a Sass file or the compilerconfig.json a recompile will be triggered. This means that when you have your Blazor app running you can make style changes and you won’t need to do a rebuild, you will be able to just refresh the browser to see your changes.
Let’s have a look at the compilerconfig.json.defaults file next.
{
  "compilers": {
    "less": {
      "autoPrefix": "",
      "cssComb": "none",
      "ieCompat": true,
      "strictMath": false,
      "strictUnits": false,
      "relativeUrls": true,
      "rootPath": "",
      "sourceMapRoot": "",
      "sourceMapBasePath": "",
      "sourceMap": false
    },
    "sass": {
      "autoPrefix": "",
      "includePath": "",
      "indentType": "space",
      "indentWidth": 2,
      "outputStyle": "nested",
      "Precision": 5,
      "relativeUrls": true,
      "sourceMapRoot": "",
      "lineFeed": "",
      "sourceMap": false
    },
    "stylus": {
      "sourceMap": false
    },
    "babel": {
      "sourceMap": false
    },
    "coffeescript": {
      "bare": false,
      "runtimeMode": "node",
      "sourceMap": false
    },
    "handlebars": {
      "root": "",
      "noBOM": false,
      "name": "",
      "namespace": "",
      "knownHelpersOnly": false,
      "forcePartial": false,
      "knownHelpers": [],
      "commonjs": "",
      "amd": false,
      "sourceMap": false
    }
  },
  "minifiers": {
    "css": {
      "enabled": true,
      "termSemicolons": true,
      "gzip": false
    },
    "javascript": {
      "enabled": true,
      "termSemicolons": true,
      "gzip": false
    }
  }
}
Ok, there’s a lot of stuff in there. So as well as compiling Sass files, Web Compiler can compile a lot of other things as well. From this defaults file, we are able to configure the settings for the various compilers.
I’m only interested in Sass and minification so everything else can be safely removed.
{
  "compilers": {
    "sass": {
      "autoPrefix": "",
      "includePath": "",
      "indentType": "space",
      "indentWidth": 2,
      "outputStyle": "nested",
      "Precision": 5,
      "relativeUrls": true,
      "sourceMapRoot": "",
      "lineFeed": "",
      "sourceMap": true
    }
  },
  "minifiers": {
    "css": {
      "enabled": true,
      "termSemicolons": true,
      "gzip": false
    }
  }
}
I’m not going to change any of the default other than to enable sourceMaps which will make life a bit easier when debugging style issues.
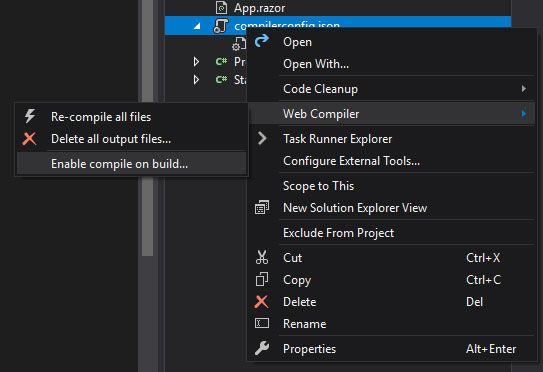
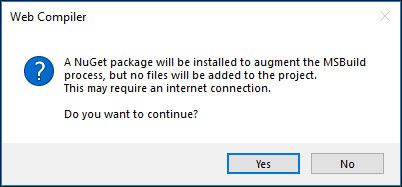
The final piece of configuration needed is to enable compile on build. This will issue a prompt to install the NuGet package I mentioned earlier. This package will provide a MSBuild task so the Sass can be compiled during builds. To do this, right click on the compilerconfig.json and go to the Web Compiler menu and then Enable compile on build…
When you see the prompt to install the NuGet package, select Y_es_.
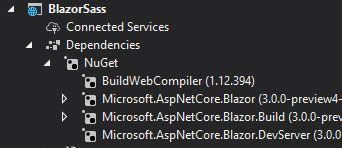
You should then be able to see the BuildWebCompiler NuGet package in your projects dependencies.
Linking the Css
The last thing to do is to add a link to the compiled Css file into the index.html.
<!DOCTYPE html>
<html>
<head>
    <meta charset="utf-8" />
    <meta name="viewport" content="width=device-width" />
    <title>BlazorSass</title>
    <base href="/" />
    <link href="css/BlazorSass.min.css" rel="stylesheet" />
</head>
<body>
    <app>Loading...</app>

    <script src="_framework/blazor.webassembly.js"></script>
</body>
</html>
That’s it, the project is now setup to use Sass for styling.
Summary
Sass is a very powerful tool to help us manage styles over traditional Css. We can even avoid the JavaScript tool chain by taking advantage of Madz excellent Web Compiler extension.
If you would like to learn more about Sass, then here are a few resources which will help you get started.
In a future post I’m going to share some ideas on how to structure Blazor applications which will include Sass structure as well. So check back for that one soon.
