

Docker is a technology which allows applications to be packaged up and run in containers. In this post we will go through how to achieve this with an ASP.NET Core application.
All code from this post is available on my GitHub account.
Step 1 - Getting Setup
I am going to be doing this from a Mac. But you can easily use Windows or Linux if you prefer.
If you don’t have it already, you will need to install Docker onto your machine.
I have added a couple of links below to install guides on the Docker site. They will walk you through the process and get you all setup and ready to go.
Step 2 (Optional) - Create an ASP.NET Core App
You maybe looking to Dockerise an existing ASP.NET Core application in which case just skip ahead to the next step.
In true Blue Peter fashion (apologies if you have no idea what that means, but it was a TV show I watched when I was a kid) here is a post I prepared earlier.
Once you have created your application we can move onto the next step.
Step 3 - Add a .dockerignore
Acting much the same as a .gitignore file. Any files or directories listed will be ignored by docker.
In the root of your application add a .dockerignore file and paste in the following.
bin/
obj/
node_modules/
If you are adding this to an existing project, feel free to add any additional items you wish to omit.
Step 4 - Add a dockerfile
The dockerfile is a bit like a blueprint. In it we are going to tell Docker how to build the image for our application. Once we have an image we can then start a container.
In the root folder for your application. Create a new file called dockerfile, note there is no file extension. And then open it up in your favourite editor and paste the following code.
FROM microsoft/aspnetcore-build AS builder
WORKDIR /source

COPY *.csproj ./
RUN dotnet restore

COPY . .
RUN dotnet publish --output /app/ --configuration Release

FROM microsoft/aspnetcore
WORKDIR /app
COPY --from=builder /app .
ENTRYPOINT ["dotnet", "YourApp.dll"]
Let’s work through this and see what’s going on.
Stage 1 - Building
FROM microsoft/aspnetcore-build AS builder
WORKDIR /source
The first line is telling docker to use the aspnetcore-build image which is created by Microsoft. This image is specifically for building and publishing an ASP.NET application.
The second line is setting the current working directory. It is probably worth noting that if this directory doesn’t exist then docker will create it.
COPY *.csproj ./
RUN dotnet restore
In these two lines we are telling Docker to copy over any file ending with .csproj to the current working directory we specified above. Then we are executing the restore command from the dotnet CLI.
COPY . .
RUN dotnet publish --output /app/ --configuration Release
Here we are copying over the remaining files of our project and then building everything using the Release configuration. This will be the application that we end up serving when we start our container.
Stage 2 - Serving
FROM microsoft/aspnetcore
WORKDIR /app
COPY --from=builder /app .
ENTRYPOINT ["dotnet", "YourApp.dll"]
We now switch to a different base image. This time we are using the aspnetcore image from Microsoft. This image is used for running compiled applications, which is what we have just done in stage 1.
The working directory is set to /app. And the compiled app we built in stage 1 is copied over into the current working directory.
Finally, the last command tells Docker how to start our app using the .NET Core runtime.
Step 5 - Building the Image
Now we have a blueprint for our container we now need to build it into an image. Once we have our image built we can then start a container.
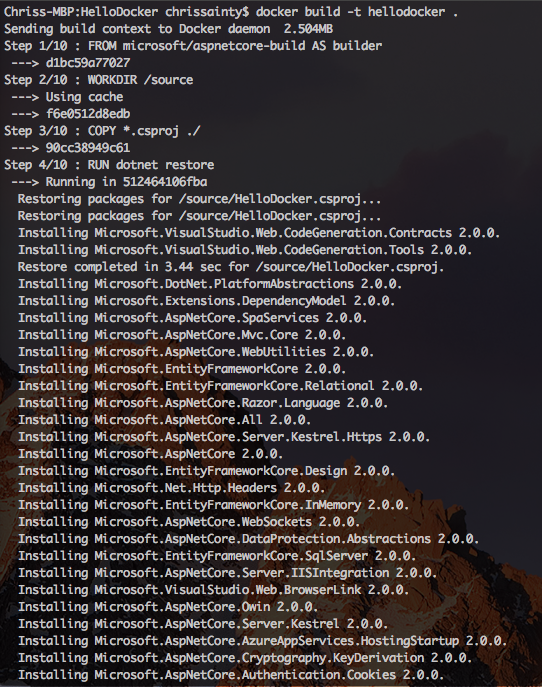
Run the following command in a terminal at the root of your application.
docker build -t yourapp .
You should see an output similar to the following:
Once that is complete you can run the docker images command. You should see your new image in the list.
Step 6 - Start a Container
The last step is to spin up a container with our application running inside.
docker run -p 5000:80 yourapp
We are telling Docker to create a new container using the image we just built. And to bind external port 5000 on that container to internal port 80.
You should then be able to open your browser and go to http://localhost:5000 and view your application!
Conclusion
In summary we have taken a ASP.NET Core application and made it compile and run inside a Docker container. All in under 30 minutes. Not bad if I do say so myself.
Once again, all the code I have used in this post is on my GitHub account.
I hope you have found this post useful. If you have any questions or feedback please leave a comment below. You can also find me on Twitter.
Until next time.
